![]()

HVE-2D™, with its built-in databases and visual user-interface can greatly reduce your data input and calculation time while improving the reliability of your analysis. For example, if your inputs have a vehicle moving in the wrong direction or a damage profile on the wrong side of the vehicle, you will see it immediately. HVE-2D also improves the accuracy of your analysis by providing engineering diagnostics and warning messages pertaining to violations of the Laws of Physics. Thorough documentation and detailed tutorials help you understand how to use HVE-2D. If that's not enough, EDC provides the best training and technical support in the business. All of this boosts your work performance and saves you time.
So . . . What is HVE-2D?
HVE-2D is an integrated environment for setting up and executing extensively validated reconstruction and simulation models, such as EDCRASH and EDSMAC4, to study a motor vehicle crash. These models allow users to reconstruct and simulate crashes involving one, two or any number of vehicles, as well as loss of control of single and articulated vehicles.
PROGRAM DETAILS
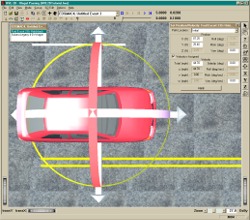
HVE-2D has a single-window design providing easy access to the main menu, toolbar, data entry dialogs, event controllers and other time-saving features. The same window is used when working in the Vehicle, Environment, Event and Playback Editors. Many of the viewer features can be simply toggled on or off by the user.
An overhead camera view with user-definable scale, pan and zoom control offers excellent visibility when setting-up and executing the event. Thumbwheels on the viewer (or a 3-button mouse) allow the user to drag or dolly the camera view. The camera can even be assigned to follow a vehicle's motion during a simulation.
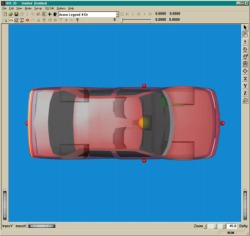
An upgrade option called HVE-2D+ replaces the standard overhead 2-D view with the same 3-D viewers used in HVE . The 3-D viewers in HVE-2D+ allow cameras to be positioned anywhere and look everywhere in a 3-D world, just like HVE. HVE-2D+ users can easily set up ground level views and target-following cameras, such as those used to display a driver's view of an impending crash or show the view of an eyewitness observing a crash.
An example showing the capabilities of HVE-2D+ compared to the regular viewers of HVE-2D is shown below:
| HVE-2D | HVE-2D+ |
 |
 |
USING HVE-2D
Using HVE-2D is as easy as 1-2-3-4. First, select the vehicles from the database. Second, import or create your scaled crash site drawing to use as the background for your work. Third, set-up and execute the reconstruction or simulation. Fourth, view all numeric and graphic reports, and even produce movies (AVI format) for real-time playback. 1-2-3-4. It's just that easy.
|
1 |
 |
Vehicle Editor - Select vehicles from databases according to Type, Make, Model, Year and Body Style. Vehicle types include Passenger Car, Pickup, Sport-Utility, Van, Truck, Trailer, Dolly and Fixed and Moving Barrier. Once you select a vehicle from the database, all of the data needed for your reconstruction or simulation is complete. If you need to make edits to the data, it's very intuitive. Edit exterior dimensions by clicking on the body. Edit tire parameters by clicking on the tire. You can change the weight, the color, the stiffness coefficients, any data that is important to your analysis. |
| 2 |
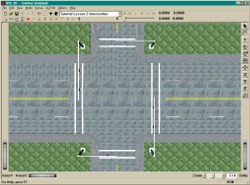 |
Environment Editor - Create and edit or import scale drawings or models (DXF or VRML format) to use as the terrain for your reconstruction or simulation. You can edit the gravitational constant. You can create frictions zones or edit the friction factor for the entire roadway to simulate dry, wet, icy or other conditions. You can also use aerial photographs and textures, such as asphalt, concrete or grass, to enhance the appearance of the environment. |
| 3 |
 |
Event Editor - Setting up your reconstruction or simulation is fast. Simply choose the calculation method (e.g. EDSMAC4) for the event and then drag and drop the vehicles directly onto your scaled crash site diagram. Assign positions and velocities and use easily accessed dialogs to enter Driver Controls, Damage Profiles, Payloads, Wheel Data (Tire Blow-out, Displacement), Accelerometers and other information. Press the Play button on the Event Controller and immediately see the results of your inputs. View Trajectory Simulations and Key Results of simulations in progress. To fine-tune your analysis or study several scenarios, you can quickly edit positions and other key parameters and re-execute the events. |
| 4
|
 |
Playback Editor - View and print all program inputs and outputs contained in the Accident History, Audit Trail, Damage Data, Damage Profile, Driver Data, Messages, Momentum Diagrams (Damage, Scene), Program Data, Site Drawing, Variable Output and Vehicle Data reports. View Trajectory Simulations and dynamic Damage Profiles. Create AVI simulation movies using the Playback Window's video interface. |